One of the foremost alluring factors of the Arduino Uno is that it allows for rapid prototyping. Arduino shields and breakout boards are a significant factor contributing to this feature. In this post, we enlist our top Arduino shields. We will provide a complete discussion of these Arduino shields’ functions, features, specifications, and applications.
What are Arduino shields though? Short answer, shields are the external hardware components with extra functionality that can mount on the Arduino. Plug and play baby!
For example: If you want to connect your Arduino with the internet for access to the data from an online cloud database, an ethernet shield will help you to perform this function.

Contents
What is an Arduino Shield?
We are assuming you are familiar with the board we will be discussing. If not, here’s a quick introduction to the Arduino Uno. Back to our question. What is an Arduino Shield? Time for a longer answer. Arduino shields are modular circuit boards that have certain functionality that will attach to your projects. Think about how Iron-man calls for the Hulk buster suit components from a satellite. And then just powers up from his regular suit to the hulk buster armour. That’s essentially what you can do with Arduino shields.

From the example, we saw above. What if we want to open the world of the internet for our Arduino Uno? And make it post on social networks? It is possible by using the ethernet shield. If you want to make a moving bot, the motor controller shield will help you to do that. These Arduino shields give wings for your inventions. Most importantly, interfacing these shields with Arduino development board is quite simple.
All you need to know is that Arduino shields are modulated circuit boards that can give extra capabilities to the Arduino Uno.
What is the Arduino Uno shield form factor?
All Arduino Uno shields have the same form factor that makes it a standard format. This form factor makes it easy for manufacturers and even hobbyists to create a plug-and-play style board.
Power and ground pins are in the first eight-pin header, and the analog pins are in the six-pin header next to it. Digital pins are present on the other side of the board. An eight-pin header is separated from the ten pin header by 0.5” spacing.
Related: How to supply power to an Arduino Uno?
Some shields use all of the I/O pins on the Arduino, but others use only a couple of pins. Some shields communicate with the Arduino through SPI, Serial communication and also through analog pins.

What are the best and most useful Arduino Uno Shields?
The top 10 most useful Arduino shields are listed below. You can click on the links to buy them. These tiny affiliate commissions help us keep the site alive. Keep reading this article for a detailed description of the functions, features, and applications of each shield.
| Arduino shield | Shield name (click to buy) | Functionality |
 |
[geoip_detect2_hide_if country=”IN”] [/geoip_detect2_hide_if] [geoip_detect2_show_if country=”IN”] [/geoip_detect2_show_if] | To control the motor speed and direction of rotation. |
 |
[geoip_detect2_hide_if country=”IN”] [/geoip_detect2_hide_if] [geoip_detect2_show_if country=”IN”] [/geoip_detect2_show_if] | To switch on and off the power supply to a device when it is required. |
 |
[geoip_detect2_hide_if country=”IN”] [/geoip_detect2_hide_if] [geoip_detect2_show_if country=”IN”] [/geoip_detect2_show_if] | To enable internet connection. Very useful in IoT projects. |
 |
[geoip_detect2_hide_if country=”IN”] [/geoip_detect2_hide_if] [geoip_detect2_show_if country=”IN”] [/geoip_detect2_show_if] | To display any data. |
 |
[geoip_detect2_hide_if country=”IN”] [/geoip_detect2_hide_if] [geoip_detect2_show_if country=”IN”] [/geoip_detect2_show_if] | To get touch input. |
 |
[geoip_detect2_hide_if country=”IN”] [/geoip_detect2_hide_if] [geoip_detect2_show_if country=”IN”] [/geoip_detect2_show_if] | To enable the Wi-fi facility for getting data wirelessly. Again, an important shield for IoT. |
 |
[geoip_detect2_hide_if country=”IN”] [/geoip_detect2_hide_if] [geoip_detect2_show_if country=”IN”] [/geoip_detect2_show_if] | To enable short distance wireless data transmission. |
 |
[geoip_detect2_hide_if country=”IN”] [/geoip_detect2_hide_if] [geoip_detect2_show_if country=”IN”] [/geoip_detect2_show_if] | To capture images |
 |
[geoip_detect2_hide_if country=”IN”] [/geoip_detect2_hide_if] [geoip_detect2_show_if country=”IN”] [/geoip_detect2_show_if] | To transmit data for long-distance wirelessly with low power consumption. |
 |
[geoip_detect2_hide_if country=”IN”] [/geoip_detect2_hide_if] [geoip_detect2_show_if country=”IN”] [/geoip_detect2_show_if] | To get sound as input. |
 |
[geoip_detect2_hide_if country=”IN”] [/geoip_detect2_hide_if] [geoip_detect2_show_if country=”IN”] [/geoip_detect2_show_if] | To support connecting extra sensors directly without complicated connections. |
 |
[geoip_detect2_hide_if country=”IN”] [/geoip_detect2_hide_if] [geoip_detect2_show_if country=”IN”] [/geoip_detect2_show_if] | The Proto-Shield makes the connection easy for you to design custom circuits. |
Why Arduino Shields are useful?
- Do your projects have complicated connections? Don’t worry about the circuitry. With a shield, all components that you need for the Arduino development board are already present on the shield.
- Interfacing of modules with Arduino is a straightforward process. You can easily attach and detach the shield with the Arduino whenever you want.
- There is almost no chance of an error in connections.
- All shields are packaged in the same format as Arduino.
- There are a wide variety of shields to choose from and increase the functionality of your Arduino projects. You can even stack these shields.
Check out our free Arduino Course for beginners.
Motor driver shield

What is the functionality of the motor driver shield?
It is used for Arduino DC motor direction control and speed control. So you don’t need to design the motor control circuitry. You can control the speed and rotation direction of one or two DC motors at the time by simply plugging the pins with this shield. Motor drivers are current amplifiers. A low current signal is an input for the motor controller IC. It can act as a bridge between the motor and the controller (the Arduino). It converts the low current signal to a high current signal. There is no special library file to interface motor driver with Arduino.
Features
- Input voltage: 40 volts(max).
- Output current: 3A(max).
- Motor channels: 4
- peak output current:2A(per channel)
- Logic voltage: 2A(min)
- Power: 25W
- It controls the motor using a standard logic level signal.
- Drive voltage: 5-35V
- Logic voltage: 5V
Specifications
- Four built-in H-bridge, high voltage, large current, full-bridge driver. Can drive DC motors, stepper motors, relay coils and other inductive loads.
- It can drive a two-phase stepper motor or four-phase stepper motor, and also two-phase DC motors.
- The high-capacity filter capacitor and the freewheeling diode protect the circuitry from being damaged by the reverse current of an inductive load.
Applications
- The motor driver shield can control the speed of the DC motor.
- It can also control the rotation direction of the DC motor
- It can execute the control given by the Arduino. Thus, it can control the motor speed and rotation according to the Arduino instruction.
- Furthermore, It can help a lot in making Simple moving bots.
Alternatives to the motor driver L298N
L293D motor driver, ULN2003 Driver Board, Gikfun EasyDriver Shield Stepper Motor Driver, SMAKN® TB6600 Upgraded Version Stepper Motor Drive Controllers, Adafruit TB6612 Stepper Motor Drive Controllers
For a full tutorial about the L298N motor driver and L293D motor driver, please visit our previous article on interfacing of DC motor using motor driver.
[geoip_detect2_hide_if country=”IN”]Buy the motor driver shield here
[/geoip_detect2_hide_if] [geoip_detect2_show_if country=”IN”]Buy the motor driver shield here
[/geoip_detect2_show_if]Relay shield
What is the functionality of the relay shield?
A relay is simply a switch that operates on electricity and can be turned on/off using low voltage signals. Hence, its general use is to cut off/supply power to a device using commands from the Arduino. The Arduino controls the relay, and the relay controls the device. Sweet! You can use this to interface devices that need complex voltage/current supplies that an Arduino can’t handle.
The principle used by the relay to perform switching operation is an electromagnetic attraction. When the circuit receives the current, the electromagnetic field is energised that produces a temporary magnetic field. It moves the relay armature for opening and closing the connections. No special library file is required for interfacing relay shield with Arduino.
Features and specifications?
- Being able to control high load current, which can reach 240V, 10A
- Option to have normally-open (NO) contact and a normally-closed (NC) contacts.
- It is safer.
- The low current can control the higher current in relays.
- The control voltage range is very large.
Advantages
- Relay plays a significant role in IoT systems. Especially for home automation purposes.
- It helps in traffic control.
- It is used in Motor drives control.
- Relays are most commonly found in a lighting control system.
- Protection systems of the electrical power system use relays.
Alternatives to the relay shield
Generic 2Channel-Relay-Module.
[geoip_detect2_hide_if country=”IN”] [/geoip_detect2_hide_if] [geoip_detect2_show_if country=”IN”] [/geoip_detect2_show_if]Ethernet shield

What is the functionality it provides?
The Arduino ethernet shield helps the Arduino board to connect to the internet. It uses the Wiznet W5100/W5200 ethernet chip that provides a network(IP) stack. It has both TCP and UDP. Besides, it requires a special library for functioning. The library used for interfacing ethernet shield with Arduino is Ethernet.h.
Features and specifications
- Dimension of PCB = 8 mm X 68.5 mm X 1.6 mm.
- Indicators:
- TX-Flashes when the data is transmitted
- RX-Flashes when the data is received
- COL-Indicates network collisions
- FEX-Indicates the full-duplex network communication
- SPD-Indicates the 100 Mb/s network connection
- LNK- It indicates the presence of the network link.
- Power required: 5V
- Current consumption: 100 mA
- The protocol used for communication with Arduino Uno: SPI
Applications
- The ethernet shield can connect your Arduino to the internet/any other LAN.
- Ethernet shield enables your Arduino to get input data and also to send the processed data to an online cloud.
- It enables remote control.
- The ethernet shield/Wifi shields powers many IoT projects.
- Smart house applications
Alternatives to the Ethernet shield
Mikroe ETH ENC28J80, Mikroe broad R- BCM 54811.
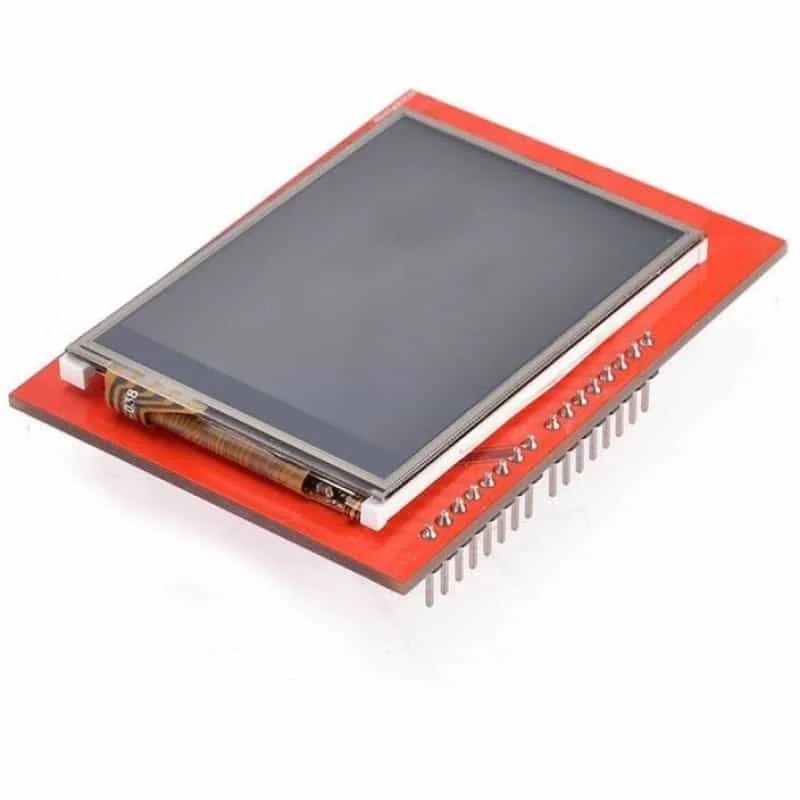
[geoip_detect2_hide_if country=”IN”] [/geoip_detect2_hide_if] [geoip_detect2_show_if country=”IN”] [/geoip_detect2_show_if]LCD shield

What is the functionality it provides?
The liquid crystal display (LCD) is pretty useful to view data from an Arduino Uno. Liquid crystal displays work by the principle of light blocking. It produces an image of a backlight. LCD is made up of a large number of pixels, and the resolution depends on the number of pixels. The most commonly used one is the 16×2 type. The same one that you can see in the image above. It has two lines. Each line can display 16 ASCII characters.
Features and specifications
- Operating Voltage is 4.7V to 5.3V.
- The current consumption is 1mA without backlight.
- Alphanumeric LCD module, meaning can display alphabets and numbers.
- Consists of two rows and each row can print 16 characters.
- Each character is built by a 5×8 or 5×7 pixel box.
- Can work on both 8-bit and 4-bit mode.
- It can also display any custom generated characters.
- Available in Green and Blue Backlight.
Applications
- The liquid crystal displays (LCDs) are used in aircraft cockpit displays.
- They are also quite common in calculators.
- For displaying images used in digital cameras
- You can find its use extensively in Arduino courses.
- We will use it in the previous posts to display temperature and humidity sensor data using an Arduino.
We have a complete guide on the interfacing of LCD with Arduino. Check it out!
Alternatives to the LCD shield
JHD162A LCD screen.
[geoip_detect2_hide_if country=”IN”] [/geoip_detect2_hide_if] [geoip_detect2_show_if country=”IN”] [/geoip_detect2_show_if]Touchscreen shield

What is the functionality it provides?
Think about the applications of the touch screen. The technology has made a markable revolution in mobile phones. This is one of the must-haves of Arduino shields if you wish to make your project stand out. It enables the user to give input by a gentle touch. It has a wide range of applications and makes the device more user-friendly.
Touch screen shield for Arduino, it has a thin-film transistor touch screen likely all smartphone displays in addition to that it has an LCD. It enables the user to give touch data or free handwriting data to the Arduino.
Features and specifications
- Resolution: It has 240*320 pixels resolution.
- It can able to display 262000 different colours.
- It has a touchpad for getting touch input.
- Input voltage: 5V
Applications
- Arduino touch Tic-Tac-Toe game
- Touch screen piano
- Ping pong game controlled by waving the hand in front of a screen
- Arduino touch paint app
- Adds a greater level of control and flair to the input mechanism. The applications are as diverse as your imagination.
Alternatives to the Touchscreen shield
TTP223-Touch key module.
[geoip_detect2_hide_if country=”IN”]Buy the touchscreen shield here
[/geoip_detect2_hide_if] [geoip_detect2_show_if country=”IN”]Buy the Touchscreen shield here
[/geoip_detect2_show_if]ESP8266 Wi-Fi shield

What is the functionality it provides?
Today we communicate with each other using mobile phones which is a wireless communication device. It helps us to communicate with our friends at any place and at any time. How about sharing a data to a machine from a distance wirelessly. It is possible by using this ESP8266 – Wi-Fi shield.
The ESP8226 is a Wi-Fi microchip with TCP/IP protocol. That can give access to any microcontroller to use your Wi-Fi network.
Features and specifications
- It has a 32- bit microcontroller itself.
- CPU: It has 80 MHz (default) or 160 MHz.
- Memory: ESP8226 has 32 KiB instruction RAM, 80 KiB user data RAM, 32 KiB instruction cache RAM, 16 KiB ETS system.
- Input: This shield has 16 GPIO pins.
- Processor: The Wi-Fi shield has an L106 32-bit RISC microprocessor core based on the Tensilica Xtensa.
- External QSPI flash:16 MiB(maximum) is supported (512 KiB to 4 MiB typically included)
- The latest version of the ESP8266 Wi-Fi shield has increased the flash disk size from 512KB to 1MB.
- It has a 10-bit ADC that is successive approximation ADC.
Applications
- You can turn On /Off any device using Windows remote Arduino
- Wi-Fi controlled remote car.
- Home management system
- Drone control
Alternatives to the 8266 Wi-Fi shield
The ESP23 is a very popular upgrade to the ESP8266.
[geoip_detect2_hide_if country=”IN”]Buy the ESP8266 WiFi shield here
[/geoip_detect2_hide_if] [geoip_detect2_show_if country=”IN”]Buy the ESP8266 Wi-fi shield here
[/geoip_detect2_show_if]NFC shield

What is the functionality it provides?
Near field communication shield, the name itself tells that it is used for short-distance communication. NFC can receive the data from the tag or ID very near to it and also it is enough to fulfil your needs during short-range communication. It uses radio waves for communication.
Features and specifications
- It has an SPI interface.
- NFC shield has a built-in PCB antenna.
- It works at both 3.3V and 5V using the TXB0104 transistor.
- Arduino NFC shield has sockets to connect with other shields.
- Communication range: 5cm(maximum).
- It is not able to read or write the ultralight chip.
- Additionally, It can only read its ID.
Applications
- It is useful in NFC voting system
- NFC ring to unlock Android phone
- Automated drawer lock using NFC
- Smart door
Alternatives to the NFC shield
DFRobot NFC module for Arduino, Grove NFC
[geoip_detect2_hide_if country=”IN”] [/geoip_detect2_hide_if] [geoip_detect2_show_if country=”IN”] [/geoip_detect2_show_if]Camera breakout board
What is the functionality it provides?
The camera is one of the most extraordinary inventions. And in terms of technologies like ML and AI, a camera can form an integral part of a project. This camera shield can add vision to your Arduino Uno.
This shield is used for giving image inputs to your Arduino board for processing. This camera shield can perform image processing such as auto white balance, automated exposure, and automated gain control, also for the video signals.
It can transfer the images taken to the micro-controller that is Arduino, using the SCCB interface. You can also form images in some other formats such as CIF that is 352×240 and others too.
Features and specifications
- It is fully compatible for Arduino
- Resolution: It has a resolution of up to 640 x 480
- Format: JPEG format
- Bus control: UART or SPI for high-speed control
- It has an integrated interface for MicroSD
- Input voltage: 5V (maximum)
Applications
- Surveillance camera
- It is used in M1 rover
- Arduino motion detector camera
- Face tracking
- Obstacle solving bot
- Maze solving bot using Image processing
Alternatives to the Camera shield
OV7670 camera module.
[geoip_detect2_hide_if country=”IN”]Buy the camera breakout board here
[/geoip_detect2_hide_if] [geoip_detect2_show_if country=”IN”]Buy the Camera breakout board here
[/geoip_detect2_show_if]Lora shield-Dragino

What is the functionality it provides?
Lora is the abbreviation of Long-Range Transceiver. The name itself tells that it is used for long-range communication. The main advantage of Lora is that it can send and receive data at long distances with low data-rate. In addition to that, it has ultra-long range spread communication and also has high interference immunity whilst minimising current.
Lora shield has a Semtech SX1276/SX1278 chip. A special library is required in any Arduino project code that uses the LoRa shield.
Features and specifications
- It works good on both 3.3V and also on 5V.
- Frequency band: 915 MHz/8688 MHz/433MHz
- Lora shield is widely used because of its low power consumption.
- It has an external antenna through the I-Pex connector.
- Blocking immunity is high.
- Dragino Lora shield has an in-built bit synchroniser.
- It can do preamble detection.
- Furthermore, it has RSSI with a 127 dB dynamic range.
- It has an Automated RF sensor and also has ultra-fast AFC.
- Whereas, it has a built-in battery indicator.
Applications
- Smart irrigation systems
- Useful Smart metering
- It has applications in Smart cities
- Long-range IoT applications.
Alternatives to the Lora shield
Xcluma-Lora-RA-02-SX 1278
[geoip_detect2_hide_if country=”IN”] [/geoip_detect2_hide_if] [geoip_detect2_show_if country=”IN”] [/geoip_detect2_show_if]Sound sensor

What is the functionality it provides?
When your friend calls your name, you will respond towards the direction from where the sound came. That means you can hear the sound. Likewise, this sound sensor helps your Arduino to detect the sound. Just like the camera shield adds vision to your Arduino Uno. Therefore, the sound sensor adds hearing functionality.
Features and specifications
- Arduino sound sensor has a built-in filter- a rectifier circuit.
- It gives DC signal output
- Additionally, it has a good sensitivity towards any sound.
- It has a built-in amplifier circuit with adjustable gain.
- The corresponding voltage signal for the signal output
- The corresponding voltage signal is obtained by AD conversion.
- It has analog voltage signal output
Applications
- Sound location finder.
- LED control using claps.
- Arduino whistle command recognition.
- Distance finder using sound waves.
Alternatives to the Sound sensor
LM393 sound sensor
[geoip_detect2_hide_if country=”IN”]Buy the sound sensor breakout board here
[/geoip_detect2_hide_if] [geoip_detect2_show_if country=”IN”]Buy the Sound sensor breakout board here
[/geoip_detect2_show_if]Input/Output Expansion shield

What is the functionality it provides?
Making a cool project and ran out of pins? If you want to do a project that involves the significant number of devices/sensors, a real-estate problem might arise during prototyping. Don’t worry! you can salvage your day with an expansion shield.
The expansion shield is a must for easy prototyping. Moreover, the direct plugging of modules and sensors is enabled by SPI and I2C interface.
The headers are differentiated by different colors based on the functionality.
- Green for digital purpose
- Blue for analog purpose
- Red for power supply(VCC)
- Black for Ground
Features
- Operating voltage: 3.3V/5V
- I/o expansion shield can be switched for wireless communication
- It has easy recognition interface
- Expansion shield has separate headers for digital and analog pins
Specifications
- Expansion shield has a 3.3V voltage output interface
- It has an I2C interface.
- Furthermore, it can support Xbee.
- It can support Bluetooth.
- Additionally, it can support SD card read/write.
- It can also support APC220.
Applications
- It enables you to do more complex projects in a simple way
- It will expand your input-output interface
- You can control a vast number of devices with any kind of complex wiring or bridge connections
- It looks pretty good for wiring, and you can avoid soldering
- It has extra digital and analog pins other than pins on your Arduino.
Alternatives to the Expansion shield
Nano 328p expansion adaptor breakout board
[geoip_detect2_hide_if country=”IN”] [/geoip_detect2_hide_if] [geoip_detect2_show_if country=”IN”] [/geoip_detect2_show_if]Prototype shield

What is the functionality it provides?
Don’t be confused between the expansion shield and prototyping shield. The expansion shield is used to increase the input/output interface pins. But the prototyping shield is just for managing jump connection and prototyping. If you want to connect devices with you Arduino, you can opt for soldering. Else, you can directly connect the device with the Arduino. But the connections to the Arduino Uno’s pins can be finicky. Although the wires will become loose and ‘jump’ out of the Arduino pins. Hence, it will be more comfortable when you use this prototype shield that allows you to mad a temporary connection.
The prototype shield makes it easy for you to design custom circuits. It consists of a breadboard. That’s it. Plain and simple.
Features and specifications
- Prototyping grid: It has a standard 0.1” x 0.1” prototyping grid that has big pads.
- It has power rails that lie down to the middle and sides.
- The prototype shield has an IC pattern with 20pins(maximum).
- It has a reset button.
- This Arduino prototype shield has an extra general use button in it
- It has 14 SOIC size parts containing a surface-mount chip.
- Prototype shield is compatible with either tiny breadboards or standard breadboards, but in this case, the rails would be removed
- It has 20.1 uF capacitors on both sides. Therefore the power stability is increased.
Applications
- Simple connections are made easy.
- You can make a jump connection easily without any problem.
Alternatives to the Prototype shield
ZY-201 830 points solderless breadboard
[geoip_detect2_hide_if country=”IN”] [/geoip_detect2_hide_if] [geoip_detect2_show_if country=”IN”] [/geoip_detect2_show_if]